custom dogs, felting with fur, needle felting

Felting With Fur – part 2

Hello, I absolutely love felting with fur! It opens up so many possibilities, and provides such as special felted keepsake for the animal’s owners.

For this dog replica I was lucky to have such a lot of fur to felt with, and it was so soft and feltable! This fur was from a much loved Japanese Spitz and the crimp of the fur very closely resembled the sheep wool I felt with.

Because of the quantity and texture of the dog fur I was able to start by felting a whole body and head from it. It might not have created as firm a shape as I can achieve from felting with wool but this fur certainly provided a good core as a base.

I felted the ears and the face.

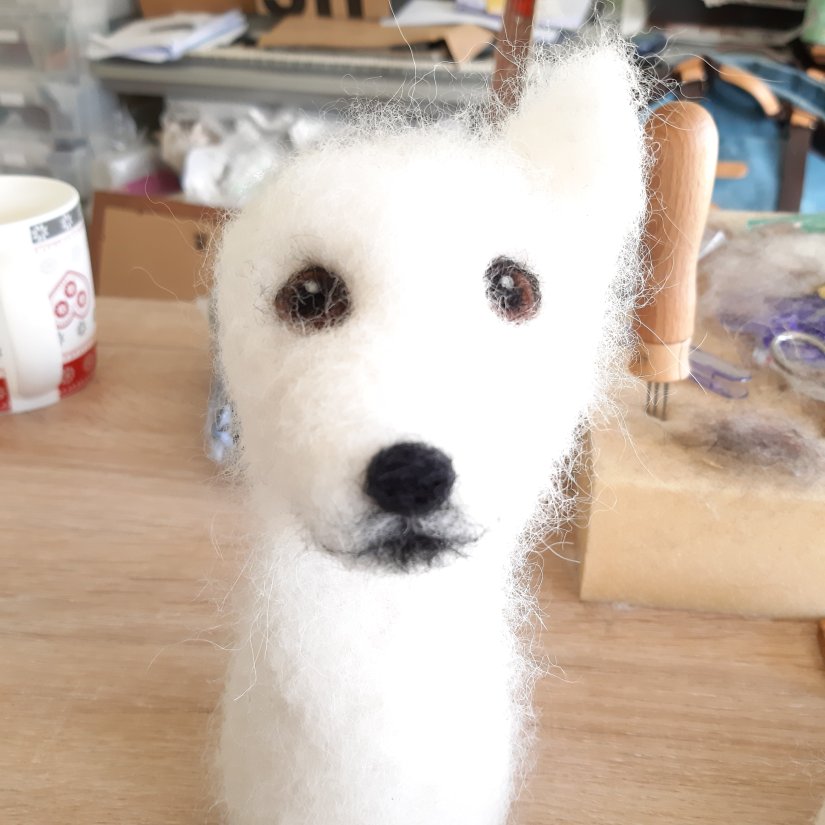
The features were the only part of the dog that had to be created with wool. Once the ears and the face were completed, I set about gently building up the fluff to give the dog the shape needed for this particular breed.

And here he is, the finished dog, a very special make.

Please get in touch if you have any questions or custom requests or visit my Etsy shop here.

Uncategorized

Sculpting with wool

In this post I write about the pleasures of sculpting with wool and how I build up a dog’s body shape with batt wool.

Pipe cleaner armatures

Recently I’ve really got into the pleasures of sculpting with wool.

I make custom dogs and nowadays I always start with a wire armature. Currently I use robust pipe cleaners to make it with. I made the mistake of buying “party” pipe cleaners as they were cheap and I thought I was getting a bargain! Lesson learned – they’re still lying there unused as they were far too flimsy! So my tip is, if you’re making an armature with pipe cleaners, try and buy those that are designed for the purpose.

I begin by felting a layer of Shetland batt to cover the wire. Batt wool is quite tangly and easy to bulk up and create shape with. The Shetland batt I use is available in four natural undyed colours and I choose the shade nearest to the dog’s natural colour.  I like to use British wool where I can from an animal welfare perspective.

Now with a layer of batt, the colour chosen to be close to the dog’s colouring

And then comes my favourite part, the shaping . I love that with needle felting I am not just mashing fibres together but sculpting . Applying extra stabs here and there enables even subtle shaping to appear.

I can’t show you the finished results of these two dogs yet as they are for a wedding cake for an autumn wedding and I don’t want to publish them before the big day!

With named breeds, I find it helps if I look online to see a skeleton first. I can make the armature to the skeleton shape and it just ensures I get proportions correct.

This Basset Hound has quite a different body shape.

The batt layer is nearly complete
The finished Basset Hound

Visit my custom dog page for more information on my customised dog miniatures or message me.

They are also available to purchase via my Etsy shop, Felt Fabulous Gifts.

Thanks for reading! x

Edit -The completed wedding cake topper dogs – safe to show now that the wedding has happened!
felted mobile, needle felting

Getting there with my sheep mobile!

 It’s taking shape…

So I weaved some willow hoops, I used up all the sticks I’d soaked and ended up making three.

(Probably should have soaked the sticks for longer but I was soaking them in the bath and the youngest needed a shower!)

fb_img_15325056432282101965039.jpg

It was time to start attaching the felted sheep and clouds.

Sheep and clouds went onto the larger hoop first.

Then I attached the two hoops together ( this was the tricky part- balanced and level being hard to achieve) .

The stars threaded easily onto the invisible thread. In the last post I wrote about being unable to thread them with the ribbon, must have been the finer needle I was able to use, and attached two to the upper, smaller hoop.

The sheep, clouds and stars are now on three levels. Not my original intention but it makes sense right?

I’d made three stars but I think it will have to be two or four now to achieve balance…?

It’s something I’ll come back to, sometimes you need to step away from a project and come back with fresh eyes.

I also need to obviously trim the ribbons and neaten it up that way, in case your thinking  “she’s left it a bit messy looking”.. but will leave that to the very end.

Anyone else out there making a mobile? How’s it going for you?

I’ll keep you posted guys…

Thanks for reading! x

needle felting

A commission leads to a cacti obsession…

Those little pots are so cute!

I hadn’t thought of making cacti before, I usually make animals when I needle felt, but that’s the beauty of a commission make.

When a customer requested two cacti and a hedgehog, naturally I was ready to have a go!

I sourced my cute little terracotta pots from Elfkendalfairies on Etsy.

First job was to put in the “soil”. I used Shetland batt in natural Moorit brown.

Next I collected all my green wools, then researched some photos of cacti before getting stuck in.

You can see from the photographs that it’s just a matter of making sausages, putting them together and then adding ridges.

I needled it into the existing soil and then as it was now all squished down, topped it up with some more batt wool.

The second cacti was a round one.

The pale yellow green wool is quite wiry in texture so is great for the hairy spikes.

I loved making these and am making more, this could be the start of a new direction for Felt Fabulous!

If you would like some, have a peep in my Etsy shop or get in touch.

Perfect gift for that friend who keeps killing off all their real plants!


20180724_1128231335086715.jpg


Thanks for reading!


Felted bowls

Felting bowls makes me happy

I love felting bowls.

Bowls, vessels, pods…. whatever you call them, I just love making them.


I wet felt them using a resist method, a process that is now second nature to me. I just set up in the kitchen (best place because it can get pretty wet and soapy), put some tunes on and go! You can do the rubbing and rolling parts quite aggressively too if you have some pent-up tension inside you!

The fulling stage comes next and is one that I really enjoy. This is where I gather my tools (anything with a rounded or curved edge, spoons, ice cream scoops etc) and rub at the wool to firm up the shape of it. (A good felted bowl is always soft but shouldn’t be floppy!) It’s exciting to see the shape of the bowl start to appear, from the felted wool that was round and flat.

Ok, you can’t put your soup in them (but I now have a hankering to try out making ceramic bowls….), but they are great for putting a tea light in. PLEASE make sure it is a battery operated one though! The light just loves to glow through the wool.

Because they are made from wool, they are safer for children’s bedrooms too. Try breaking one, you can’t! Nice and soft for jewellery and watches too.

I use a variety of wool colours and types to make my bowls. It’s always good to learn new things and learning about the different wools and their textures has been really interesting.

If you like felt bowls too, or are just curious, have a look at my felt bowls in my Etsy shop, Felt Fabulous Gifts. There are also some pictures there that show some of the process of making them.

Thanks for reading!

http://www.feltfabulousgifts.etsy.com